Camera
Virtually all deep sky objects are quite faint and you can’t get images of them by simply pointing a camera up to the sky and pressing the button. In order to capture the faint light coming from these objects, you need to take long exposures (of at least 30 seconds). With this in mind, I need to use a camera that has the ability to take very long exposure lengths (aka bulb mode). The camera also has to be of the SLR type so that original lenses can be taken off and the camera body be attached to telescopes via an adaptor. Canon and Nikon seem to be the main contenders in DSLR astrophotography
Following (tracking) the sky
The next hurdle is the movement of the sky. The Earth’s rotation causes the whole sky to move. Stars and galaxies rise and set just as the Sun and Moon do. This means that taking a long exposure of the sky just with a camera and tripod at night makes everything blur in the picture. This is because in the space of 30 seconds or more, the sky has moved a little. To rectify this, the telescope is placed on a motorised equatorial mount. This is more of a glorified heavy-duty tripod with motors. It’s aligned with a certain point in the sky (the celestial north pole) which then means you can turn the motors on and the telescope will follow its target as it moves across the night sky.
Dealing with vibration
When imaging at high magnification, things can get quite tricky. The slightest foreign movement of the telescope can ruin an image. A windy night can postpone an imaging session if it’s strong enough to move the telescope tube even a fraction. You cannot press the button on the camera, it has to be done either via timer delay or remotely. For this, I used to use an infa-red remote control, however I now use a laptop and camera control software. Other measures are taken to prevent vibration while the camera opens its shutter/mirror. A simple setting called mirror lock-up is set in the camera whereby the camera moves the mirror inside then waits a couple seconds for vibration to settle before opening the actual shutter.
Image capture
I use software on the laptop called ImagesPlus which lets me choose my exposure lengths, camera settings and choose how many images to take. It will allow me to choose unlimited exposure lengths over 30 seconds. This is great as it allows me to take for example 30 exposures at 300 seconds (5 minutes) each with just one click of a mouse without touching the camera or telescope.
Why multiple exposures?
I hear you ask, why take multiple shots of the same thing? In an ideal world, astrophotographers would take a single shot of a target lasting hours. There are a number of reasons for not doing this. Firstly, digital cameras suffer from ‘camera noise’ which worsens with longer exposures due to the heat created by the digital sensor chip. Taking multiple exposures allows you to eliminate this noise with the help of imaging software. It is also very hard to get your telescope to accurately track the sky for hours at a time, it would take incredible accuracy. There are other factors such as satellites and plane lights sometimes flying through the frame shot ruining that particular image. With all this in mind it’s best to take shorter exposures and take a lot of them. With digital imagery these shorter images can all be stacked and processed together in to one image which brings out the required detail.
Guiding
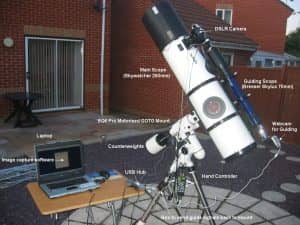
Guiding is a process where you can increase the length of time that your mount accurately follows objects in the sky. This is achieved by using a second imaging camera and telescope, (as shown in the image above), all attached to the mount which concentrates on just one star while your other camera is imaging a target. Software such as PHD is used to ‘watch’ the star while your mount is tracking. If the star drifts in any direction, the software sends regular instructions to the mount to correct the movement to keep the star stationary. In turn, this is keeping the whole mount and imaging telescope accurately tracking everything in the sky for longer amounts of time. I tend to keep my images to 5 or 6 minutes in length each. Without guiding turned on, my maximum possible exposure time was 90 seconds.
Automation
There’s a whole host of hardware and software out there for astrophotographers to make the imaging a little less tiresome. I use EQAscom alongside Stellarium Scope for mount control, ImagesPlus camera control software, PHD guiding software and TeamViewer (on occasion) for remotely controlling everything from inside if it’s just too cold to be checking on everything.
Post processing
Without boring you to tears, I’ll keep this short and sweet. The images are captured in RAW format. This way, the image has not been altered in any way by the camera. The images are then stacked together and tweaked in many different pieces of software with different uses. I use ImagesPlus, Adobe PhotoShop CS6 and PaintShop Pro.